|
|
PiButton - Simple user input for Raspberry Pi
|

February 2014
Introduction
This project page describes a simple and cheap way of invoking commands on a Raspberry Pi without having to have a terminal session connected.
The objective was to be able to invoke one of a number of Operating System commands from a single button, by using the number of consecutive presses to represent the chosen command. The command would need to be set in a text configuration file which could be easily changed, and read in when the system boots up.
Background
Having set up a Raspberry Pi with a camera board and the motion software, so that it records .avi files and sends emails when movement is triggered, I realised that there were a couple of things I needed an SSH terminal connection to do when it was running. However, it would have been much nicer if I could have done these on the Raspberry Pi itself, rather than having to go to a computer and the connect a terminal session to it. These specific functions for the application in hand, were; stopping the motion service running, starting it again, halting the OS and restarting the OS.
Initially one answer seemed to be to provide a switch for each of these functions which each connected to an input on the GPIO, and then to have a program which would auto run at boot time, and continually monitor the status of the GPIO inputs and invoke any necessary commands. However, even with miniature switches, there not much room anywhere on a standard Raspberry Pi case for that many functions. A more practical (though not necessarily more ergonomic) solution is to overload a single switch. Software would instead; monitor a single input pin on the GPIO for presses from a switch, and multiple presses would be accumulated. If the user waits for two seconds after pressing the button, the number of presses accumulated so far is used to determine the appropriate command to execute.
These commands and the number of presses needed for each, would be stored in a text configuration file which the software program would read when the system starts up. The commands could obviously be used for a variety of purposes and would not need to be specific to any single Raspberry Pi application.
Example
Operation
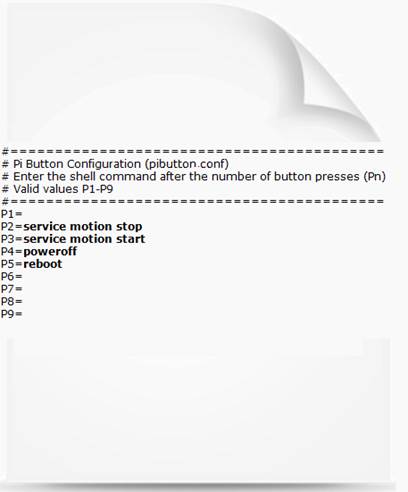
Consider the following text configuration file which
allows the movement detection software, "motion" to be stopped or
started, and the Raspberry Pi OS to powered down or rebooted based on the
number of times a button is pressed:
Based on the settings above, the following video demonstrates :
|
Operation |
Action |
|
stopping motion |
two button presses, camera LED goes out as motion
stops |
|
starting motion |
three button presses, camera LED comes back on as
motion restarts |
|
halting the Raspberry Pi |
four button presses, Raspberry Pi powers down into halt state (takes
about 10s) |
|
Restarting the Raspberry |
one button press, utilising using GPIO ‘wake from
Halt’ feature, restarts the OS (takes about 30s) |
if video is not
visible, your browser does not support HTML5 video, you can download the video instead.
Hardware
|
Note shorting any pins on the GPIO header without ensuring that the current is suitably limited will permanently damage the GPIO. You normally need to provide a resistor in the circuit. I am not responsible for any damage to your hardware. If you are in doubt, don’t do it. Find out first.
|
There are a couple of GPIO pins which each have an internal pull up resistor. If one of these were used for the button input, all I would need would be a switch which shorted the pin to ground. Current limiting would be done internally. These pins with internal pull up resistors are the I2C pins, SDA and SCL. The SCL pin occupies the GPIO header pin (pin5) and is opposite one of the ground pins (pin 6). This makes it convenient for fitting a 2 pin connector across pins 5 and pin 6 from the switch.
One slight complication is that the GPIO pin used is different for Revision 1 boards (GPIO 1) than for Revision 2 boards (GPIO 3). This means that the software would need to work out which revision of board it was running on when it starts up, and select the appropriate input to monitor. That is a software problem though, and for now all I needed was the ability to short pins 5 and 6 (on the GPIO header) from a button, regardless of the board Revision.
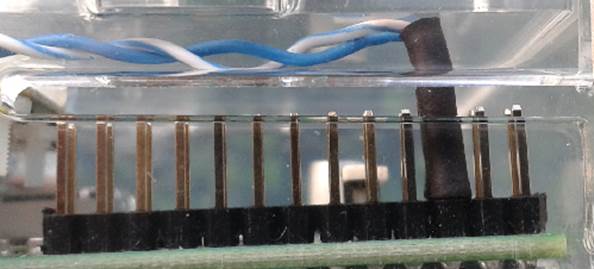
A ‘momentary, SPST, normally open’ push switch was wired up to a 0.1 inch pitch, two way female connector.

A hole was drilled and then filed out in the USB socket end of an Adafruit PiBox to accommodate the switch, and the female connector was push fitted on pins 5 and 6 of the GPIO header.
After trying to fit this, I was found that using it together with a micro SD Card adapter (which is thicker than an SD Card) in an Adafruit PiBox was a very tight fit. So I removed the black plastic pin casing, applied heat shrink to the pins and push fitted them individually to pins 5 and 6 on the GPIO header.
Wake from Halt Feature
Note that many boards since 2012 include a feature which allows the OS to be woken following a halt/powerdown command. This is achieved by momentarily shorting GPIO header, pin 5 to ground (see http://elinux.org/RPI_safe_mode). This means that following halt/powerdown the Raspberry Pi can be restarted by pressing the same switch (once) which was used to halt it in the first place. This is the last action demonstrated in the video above
Software
The software uses a single C module (pibutton.c), and requires the bcm2835 library for accessing the GPIO from http://www.airspayce.com/mikem/bcm2835/
Functionality
The following steps are carried out by the pibutton software:
· Reads in the commands from /etc/pibutton.conf and displays them to stdout
· Initialises bcm2835 library
· Deduces whether the board is Revision 1 or Revision 2 or later (by analysing /proc/cmdline)
· Initialises the relevant GPIO pin as an input (based on board Revision found in the step above) for SCL on GPIO header pin 5
· Then it enters a continuous loop, monitoring for button press and accumulating presses. When 2 seconds has elapsed the relevant command is executed. Care is taken to use sleep rather than delay to prevent consuming cpu cycles unnecessarily.
Installation
Libraries
Install the latest version of bcm2835 from the link above. Instructions are provided on that site for its own installation.
Compiling
Compile pibutton.c using
gcc -o pibutton
pibutton.c -l bcm2835 –lrt
Ensure it is executable
sudo chmod
+x pibutton
Local Testing
Ensure that the switch is fitted across pins 5 and 6 of the GPIO header.
Edit the pibutton.conf file and save it to the /etc directory
Run pibutton from the command prompt and observe standard out.
You should see a program header, the contents of the configuration file as read in by the program, and which Revision Raspberry Pi board you are using, and whether it has been overclocked or not :
=================================
Pi Button
pibutton@mhr.me.uk February 2014
=================================
1
2
3
4 poweroff
5 reboot
6
7
8
9
Running, expecting switch on GPIO 1 (Board revision 1, overclocked
=0)
Pressing the button should output feedback on the terminal (e.g. 1 press = no command).
GPIO 1 pressed (1)
Detected 1 presses, Command 1 is not configured, ignoring this
button input
Pressing the button so that a command is invoked should output feedback on the terminal and carry out the command (e.g. 5 presses = reboot)
GPIO 1 pressed (1)
GPIO 1 pressed (2)
GPIO 1 pressed (3)
GPIO 1 pressed (4)
GPIO 1 pressed (5)
Detected 5 presses,
executing command [reboot]
The system is going
down for reboot NOW!k (pts/0) (Sun Feb 9
14:40:59 2014):
If that all works, we can now make it auto run (see next section).
Installing for auto startup
The auto run technique being used here is to add the file to rc.local.
This runs as root so the pibutton executable needs to be owned by root
sudo chown root pibutton
and move it to /usr/sbin
sudo mv /usr/sbin
Edit /etc/rc.local
sudo nano /etc/rc.local
And add the line
/usr/sbin/pibutton
Just before the existing line:
exit 0
Save the file, and exit the editor (Ctrl-O, Enter, Ctrl-X)
Reboot the Raspberry Pi. When it has restarted check that pibutton has run up by checking it has a process number.
pi@dev:~# pidof pibutton
2502
root@mtu:~#
Carry further out checks by pressing the button and ensuring the expected commands are executed.
Downloads
Warning: This project is a prototype, built for fun and
proof of concept.
Downloads are therefore made available in the hope that they
will be useful, but without any warranty; without even the implied warranty of
merchantability or fitness for a particular purpose.
All source code is made available under GNU General Public
License.